

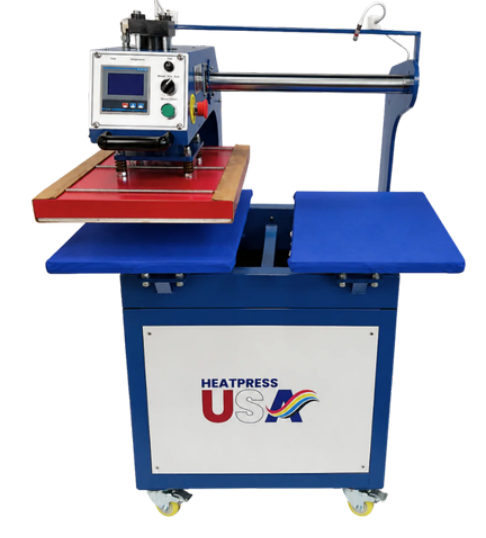
| Specification | Details |
|---|---|
| Model | HeatpressUSA HP-1620H |
| Product type | Hydraulic dual-platen heat press machine |
| Heating plate size | 16 × 20 in (40 × 50 cm) |
| Power supply | 2100 W, 110 V, 19 A |
| Maximum pressure | 120 psi / 0.8 MPa |
| Machine dimensions | 39 in (L) × 35 in (W) × 55 in (H) |
| Machine weight | 455 lbs |
1. Purpose and Intended Use
This manual provides essential information for safe installation, daily operation, routine maintenance, troubleshooting, and warranty awareness for the HeatpressUSA HP-1620H hydraulic heat press machine.
The machine is designed for commercial apparel decoration workflows that require stable pressure, firm contact, and repeatable pressing results.
The HP-1620H is suitable for DTF transfers, heat transfer vinyl, and other compatible heat-applied products.
Always follow the transfer material supplier’s recommended temperature, time, and pressure settings.
2. Key Features
- Hydraulic oil-pressure mechanism for consistent pressing force without an external air compressor.
- Dual-platen layout that allows one side to be loaded while the other side is pressing.
- 16 × 20 in heating plate designed for common apparel production sizes.
- Maximum pressure of 120 psi for demanding heat transfer applications.
- Temperature range up to 500°F and timer range up to 999 seconds.
- 110 V operation for shops that prefer a self-contained pressing setup.
3. Safety Requirements
Operator Safety
- Operate the machine only after receiving proper training.
- Keep hands, clothing, hair, jewelry, and tools away from the platen area during pressing.
- Do not touch the heating plate, upper platen, or heated surfaces during or immediately after use.
- Use heat-resistant gloves when handling hot garments, transfer sheets, or platens.
- Keep children, visitors, and unauthorized personnel away from the work area.
- Do not operate the machine when tired, distracted, or under unsafe shop conditions.
Electrical Safety
- Connect the machine only to a properly grounded 110 V outlet capable of supporting a 19 A load.
- Do not use damaged power cords, loose outlets, undersized extension cords, or overloaded circuits.
- Keep the power cord away from hot surfaces, liquid, sharp edges, and moving parts.
- Turn off and unplug the machine before cleaning, inspection, maintenance, or service work.
- Do not open electrical panels unless you are qualified to service electrical equipment.
Hydraulic and Mechanical Safety
- Do not bypass guards, switches, controls, or safety features.
- Do not place any body part between the platens while the machine is powered on.
- Inspect the machine for abnormal noise, leaking oil, loose hardware, or unstable movement before use.
- Stop operation immediately if the machine does not press, release, heat, or move normally.
- Never modify the hydraulic system, frame, platen mounts, wiring, or control system without authorization.
4. Installation and Setup
Site Requirements
| Area | Requirement |
|---|---|
| Floor | Stable, level, and strong enough to support at least 455 lbs plus working load |
| Clearance | Allow safe operator access around the machine and platen travel area |
| Ventilation | Use in a clean, dry, well-ventilated production area |
| Power | Dedicated grounded 110 V circuit recommended; 19 A load capacity required |
| Environment | Avoid moisture, dust buildup, direct water exposure, and extreme temperature swings |
Unpacking and Initial Inspection
- Inspect the package for shipping damage before opening.
- Remove packaging carefully and keep hardware, manuals, and accessories together.
- Confirm the machine is stable and positioned on a level surface.
- Check for loose bolts, damaged cables, visible oil leakage, cracked panels, or bent components.
- Verify that the heating plate and lower platens are clean and free of packing material.
- Do not power on the machine if any damage or unsafe condition is found.
Pre-Operation Checklist
| Checkpoint | Required condition |
|---|---|
| Power cord and plug | No visible damage; connected to proper outlet |
| Emergency/safety controls | Accessible and functional |
| Platens | Clean, aligned, and free of debris |
| Pressure setting | Adjusted for the garment and transfer type |
| Temperature setting | Set according to transfer requirements |
| Timer setting | Set according to transfer requirements |
| Work area | Clear of loose tools, packaging, and obstacles |
5. Control and Operating Overview
The HP-1620H uses a hydraulic pressing system to deliver stable pressure during the press cycle. Operators should confirm temperature, time, and pressure before production and should always test press before running customer orders or bulk production.
Primary Settings
| Item | Requirement |
|---|---|
| Temperature | Up to 500°F |
| Time | 0–999 seconds |
| Pressure | Up to 120 psi |
| Power | 2100 W / 110 V / 19 A |
Common Applications
| Item | Requirement |
|---|---|
| DTF transfers | Follow film/ink/powder instructions |
| HTV | Follow vinyl supplier instructions |
| Apparel | Use compatible fabric settings |
| Test press | Required before production |
6. Standard Operating Procedure
A. Power On and Warm Up
- Confirm the machine is installed on a level surface and the work area is clear.
- Plug the machine into the correct grounded outlet.
- Turn on the main power switch.
- Set the required temperature and time for the transfer application.
- Allow the heating plate to reach the set temperature before pressing.
- Confirm the displayed temperature is stable before production begins.
B. Prepare the Garment and Transfer
- Place the garment flat on the lower platen. Remove wrinkles, seams, zippers, and obstructions from the press area whenever possible.
- Pre-press the garment if required to remove moisture and flatten the surface.
- Position the transfer accurately on the garment.
- Use a cover sheet or protective sheet when required by the transfer material.
C. Pressing Cycle
- Load one lower platen while the other side is ready for pressing, if using a continuous dual-platen workflow.
- Move the prepared garment into the press position according to the machine layout.
- Start the press cycle using the machine controls.
- Keep hands and tools away from the platen area during the full cycle.
- Wait until the timer completes and the machine releases before removing the garment.
- Peel the transfer hot, warm, or cold according to the transfer material instructions.
- Perform a finishing press if required by the transfer supplier.
D. Shutdown
- Complete all active pressing cycles before shutting down.
- Turn off the heating/control system using the machine power switch.
- Allow heated surfaces to cool before cleaning or covering the machine.
- Unplug the machine before maintenance or extended downtime.
- Leave the work area clean and free of transfer residue, garment fibers, and loose materials.
7. Daily Care and Maintenance
Routine maintenance helps preserve heat consistency, pressure accuracy, platen condition, and operator safety. Maintenance frequency depends on shop volume, environment, garment type, and transfer materials used.
| Frequency | Maintenance action |
|---|---|
| Before each shift | Inspect power cord, controls, platen surface, frame stability, and hydraulic movement. |
| Daily after use | Wipe platens after cooling; remove adhesive residue, lint, film scraps, and debris. |
| Weekly | Check visible hardware, platen alignment, silicone pad condition, and abnormal noise. |
| Monthly | Inspect hydraulic system area for visible leakage, unstable pressure, or irregular movement. |
| As needed | Replace worn pads, platen covers, high-temperature sheets, fuses, or consumable parts. |
Cleaning Guidelines
- Use a soft cloth for exterior surfaces after the machine has cooled.
- Remove transfer residue from platen surfaces carefully without scratching the heating plate.
- Do not use harsh solvents, abrasive pads, or excessive moisture on electrical areas.
- Keep lower platen pads clean, flat, and free of hardened adhesive buildup.
- Replace worn silicone pads or covers when pressure becomes uneven or surface damage is visible.
8. Troubleshooting Guide
| Issue | Possible cause | Recommended action |
|---|---|---|
| Machine does not power on | No power, loose plug, circuit issue, fuse issue | Confirm outlet, plug, breaker, and fuse condition. Contact support if unresolved. |
| Temperature does not rise | Incorrect setting, heating issue, control issue | Verify set temperature and power supply. Stop use if heating remains abnormal. |
| Uneven transfer result | Uneven pressure, worn pad, garment obstruction | Check platen surface, pressure setting, pad condition, and garment placement. |
| Transfer does not adhere | Low temperature, short time, low pressure, incompatible material | Increase settings only within transfer supplier recommendations and test again. |
| Scorching or press marks | Temperature too high, time too long, excessive pressure | Reduce settings, use protective sheet, and test on sample fabric. |
| Machine makes abnormal noise | Loose component, hydraulic issue, mechanical obstruction | Stop operation and inspect. Contact support if noise continues. |
| Hydraulic movement is unstable | Hydraulic system issue or mechanical obstruction | Stop use immediately and contact technical support. |
9. Production Tips
- Keep a written record of successful settings for each garment type, transfer type, and finish requirement.
- Use consistent garment placement methods to reduce alignment errors during repeat production.
- Test press before high-volume jobs, especially when changing film, powder, ink, vinyl, fabric, or supplier.
- Avoid pressing across thick seams, buttons, collars, zippers, or raised areas that can reduce pressure uniformity.
- Do not overload the platen or force oversized items into the press area.
- Allow enough workflow space for loading, unloading, cooling, peeling, and quality control.
10. Warranty and Support Summary
| Category | Details |
|---|---|
| Coverage | 12-month limited warranty from the documented delivery date. The written Hydraulic Heat Press Limited Warranty explains covered original parts, exclusions and claim procedures. |
| Wear and maintenance | Routine maintenance, consumables and normal wear are excluded. A defect in an otherwise covered original part may qualify after evaluation. |
| Replacement parts and shipping | Approved replacement parts and standard outbound shipping within the contiguous United States are covered. Other destinations or expedited shipping may involve additional charges. |
| Technical support and service | Remote support comes first. If a confirmed covered defect cannot reasonably be resolved remotely, we cover reasonable labor, travel and repairs when our technical team authorizes a necessary on-site visit. |
Read the full Hydraulic Heat Press Limited Warranty.
11. Hydraulic Oil Specification and Service
The HP-1620H hydraulic power unit requires clean anti-wear hydraulic oil of the correct viscosity. Use only fluid clearly marked ISO VG 46 or AW-46, and prevent dirt, water, lint, and transfer residue from entering the reservoir.
| Specification | Requirement |
|---|---|
| Required viscosity grade | ISO VG 46 / AW-46 |
| Fluid type | Anti-wear hydraulic oil |
| Recommended product example | STP Hydraulic Oil AW 46 |
| Product part number | STPAW46 |
| Container shown | 5 US gal (18.9 L)* |
| Performance properties | Anti-wear, oxidation inhibited, low-foam |
*The 5-gallon quantity is the package size and does not indicate the machine reservoir capacity. Use only oil labeled ISO VG 46 / AW-46.
A. Before Checking or Adding Oil
- Place the machine on a stable, level floor and keep the work area clear.
- Complete all active cycles, switch off the main power, and disconnect the power cord.
- Allow hot surfaces to cool and wait until all machine movement has stopped.
- Clean the area around the reservoir cap or level indicator before opening it.
- Use clean gloves, a clean funnel, and a sealed container of the correct oil grade.
B. Checking and Adding Oil
- Locate the hydraulic reservoir level mark, sight gauge, or fill cap. Contact HeatpressUSA support if the service point is not clearly identified.
- Check the level with the machine level and fully stopped. A continuing drop in oil level may indicate a leak.
- Add oil slowly in small amounts. Do not overfill the reservoir and do not allow contaminants to enter.
- Secure the cap, wipe away any oil, reconnect power, and run several no-load press cycles.
- Stop immediately if there is leakage, foaming, unstable motion, abnormal noise, or failure to build pressure.
C. Inspection and Service Indicators
- Low oil level: Inspect for leaks before topping up.
- Milky or cloudy oil: Possible water contamination.
- Dark oil or burnt odor: Stop use and arrange service.
- Foaming: Possible contamination, overfill, or air entry.
- Slow or uneven movement: Check oil level and hydraulic condition.
- Incorrect fluid added: Do not operate; contact technical support.
Product example information: STP Hydraulic Oil AW 46, Part # STPAW46. Follow the product label and applicable disposal requirements.
Contact DTF Printer USA
DTF PRINTER USA LLC · 12603 Executive Drive, Suite 814, Stafford, TX 77477 · info@dtfprinterusa.com · www.dtfprinterusa.com